Pages

Wednesday, August 31, 2016

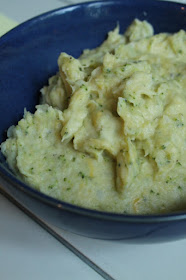
Broccoli Cheddar Mashed Potatoes


Oh my goodness I found a new favorite thing.  Last week we had a potluck at work and I was kind of torn about what to do.  I always enjoy bringing dessert but it seems so does everyone else.  When I went to sign up, there were 6 desserts and 2 savory dishes.  I could hardly justify adding to the sweets list.  After a bit of research I found these broccoli cheddar mashed potatoes. 


This recipes feeds a ton which was perfect for the potluck; however, next time I will be cutting down the portions to fit our family of three.  The recipe though is super simple and is full of ingredients we always have on hand.  You boil potatoes and right before the potatoes are done you add the broccoli.  Finishing cooking, drain and mash up just like any other mashed potato recipe.  At the very end you add shredded cheese. These mashed potatoes are truly divine and I see them in our very near future again. 

Broccoli Cheddar Mashed Potatoes

by Emily Morris
Prep Time: 10 minutes
Cook Time: 10 minutes
Keywords: saute side broccoli cheese potatoes
Ingredients (serves 10)
  • 3 pounds russet potatoes, peeled if desired and cut into 2-inch pieces
  • 3 cups frozen broccoli florets
  • 1/4 cup butter
  • 1/2-3/4 cup milk
  • 2 cups shredded cheddar cheese
  • 1 teaspoon salt
  • 1/2 teaspoon ground black pepper
  • Melted butter
Instructions
In a 4- to 5-quart Dutch oven, cook potatoes, covered, in enough lightly salted boiling water to cover for 20 to 25 minutes or until tender. When the potatoes are nearly cooked (about 5 minutes remaining), add broccoli florets to the Dutch oven. Drain.

Return the hot, drained potatoes to the hot Dutch oven. Add the 1/4 cup butter. Let stand, uncovered, for 2 to 3 minutes. Meanwhile, in a small saucepan, heat the milk over low heat until hot but not boiling.

Mash potatoes with a potato masher or beat with an electric mixer on low speed just until light and fluffy.

Stir in the warm milk, cheddar cheese, salt and pepper. Gradually stir in additional milk to make potatoes desired creaminess. If desired, serve with additional butter.
Powered by Recipage
Monday, August 29, 2016

BLT Pasta #secretrecipeclub


It's back to school! Can you believe it?  Labor day is knocking out our doors.  I am not sure where the summer has gone but I will say I am ready for Fall. Hooded Sweatshirts.  Apple cider. Yep, count me in.

But before we bid summer good-bye the Secret Recipe Club is back for a special themed posting to celebrate quick snacks and meals. Perfect for those busy and stressful weeknights. 

I was assigned Wendy of A Day in the Life on the Farm.  A fellow former Group D member and a member of the ‪#‎thebookclubcookbookCC I have had the pleasure of reading her blog off and on for many years. Besides all of her blogging duties she stays busy with a grandchild, foreign exchange students, and a working farm with raising animals and fruit trees and vegetables. Some day we hope to be able to raise some animals and have a much larger garden. Not only does homemade/homegrown taste much better but it is so much fun to be able to show Miss O where the food we eat comes from.  I don't know how Wendy keeps it all up. 


After a bit of hunting I found this pasta dish. I always find pasta quick and easy plus super comforting.  I liked this one because it had some bacon and veggies. Meat for my man and veggies for all. Plus who doesn't like a BLT sandwich. This pasta is a BLT pasta.  Yum right?

This meal is perfect for a stressful evening. While the pasta is cooking you whip up some bacon and then saute the tomatoes, onions and spinach in the bacon grease. Once everything is cooked up you toss together along with some herb oil.  Fast and oh so delicious. 

Beside the pasta I also eyed these wonderful Salmon burgers and apple cider bundt cake and brownie hot fudge sundaes. Too bad you cannot live off of brownie hot fudge sundaes for too long.


BLT Pasta

by Emily Morris
Prep Time: 10 minutes
Cook Time: 10 minutes
Keywords: entree bacon pasta tomato
Ingredients (serves 6)
  • 3/4 lb. Rotini (or whatever pasta you have on hand)
  • 1/2 small onion, diced
  • 1/2 lb. bacon, diced
  • 1 pt. cherry tomatoes, halved
  • salt and pepper to taste
  • 1 pkg. organic baby spinach leaves
  • 2 T. flavored dipping oil or olive oil mixed with 1 t. Italian Herbs
  • Grated Parmesan Cheese for sprinkling 
Instructions
Cook the pasta according to package directions.

While pasta is boiling, cook bacon in large skillet over med high heat until crisp. Remove to a plate lined with paper towel. Pour off all but 1 T. of the bacon grease.

Return pan to burner over med high heat, add onions to pan and cook until tender, stirring to loosen any brown bits stuck to the bottom of the pan. Add the tomatoes, season with salt and pepper and cook until slightly softened. Add the spinach and toss until wilted.

Drain the pasta and immediately toss it with the vegetables. Add the dipping oil and toss to coat. Serve with the grated cheese.
Powered by Recipage


Wednesday, August 17, 2016

Asian Beef Lettuce Wraps


Not sure how it came to be Wednesday already.  Where does the time go?  We have so many things going on right now it is no wonder I don't remember the days.  We are in the midst of a bathroom renovation. The demo is complete and now it is time to put everything back together. We started car shopping.  I forgot how much I HATE car shopping.  And then there is the real work stuff with trips in and out of Cleveland every other week. 


With everything going on I am all about quick and easy these days. Oh yes, recipes must also not use the oven.  Connecticut is still hot and humid.  These Asian Beef Lettuce wraps were a way to use up some ground beef without making burgers.  The result was an easy recipe with amazing flavor.  It was a great new week day meal to switch things up a bit. Filling but not too heavy in your stomach. We made it for dinner but you could easily have smaller portions for party appetizers.  

Asian Beef Lettuce Wraps

by Emily Morris
Prep Time: 20 minutes
Cook Time: 15 minutes
Keywords: saute entree appetizer ground beef Chinese
Ingredients (serves 4)
  • 16 leaves Boston Bibb lettuce
  • 1 lb lean ground beef
  • 1 tablespoon cooking oil
  • 1 large onion, chopped
  • 2 fresh garlic cloves, minced
  • 1 tablespoon soy sauce
  • 1⁄4 cup Hoisin sauce
  • 1 teaspoon ground ginger
  • 1 tablespoon rice wine vinegar
  • 1 bunch green onion, chopped
  • 2 teaspoons sesame oil
Instructions
Rinse whole lettuce leaves and pat dry, being careful not tear them. Set aside.

In a medium skillet over high heat, brown the ground beef in 1 tablespoon of oil, stirring often. Drain, and set aside to cool.

Cook the onion in the same pan, stirring frequently. Add the garlic, soy sauce, Hoisin sauce, ginger, vinegar, and chili pepper sauce to the onions, and stir. Stir in chopped green onions, and sesame oil, and continue cooking until the onions just begin to wilt, about 2 minutes.

To plate, arrange lettuce leaves on plate and pile meat mixture in the center. Serve with rice if desired. Wrap the lettuce around the meat like a burrito.
Powered by Recipage

Friday, August 12, 2016

Frozen Hot Chocolate


The dog days of summer are here. It is hot and humid.  The weather has been like this for a few days now and the forecast is to continue through next week.  Yuck!  We don't have A/C and all I want to do is seat under a fan and not move.  Life doesn't really allow for this; life with a toddler certainly doesn't.  If I can convince Miss O to stay near me under the fan it is normally because she is on top of me.  A hot little baby on your lap does not help. 


Typically I can have hot chocolate year round. I love the stuff. It is my special little treat without being too indulgent.  Even in the summer I probably have a mug once a week.  Well this week the heat has won and I couldn't image drinking anything room temperature let along hot.  Good thing there is a such a thing as frozen hot chocolate. 


I whipped this up the other afternoon when I happened to have the house to myself.  I drank and drank and drank and sat under the fan. Now if only this could continue each day even after the heat let's up. 

Now if you are looking for hot chocolate this is not it.  It is more liked a whipped frozen chocolate drink. Certainly good but not quite hot chocolate.  The whipped cream and chocolate toppings make it extra special.

Frozen Hot Chocolate


by Emily Morris
Prep Time: 5 minutes
Keywords: blender dessert beverage chocolate
Ingredients (serves 2)
  • 1/3 cup granulated sugar
  • 1/3 cup nonfat dry milk powder
  • 4 tablespoons cocoa powder
  • Pinch salt
  • 1 cup milk
  • 1/2 cup heavy cream
  • 3 cups ice
  • Whipped cream
  • Shavings from a semisweet chocolate bar or mini chocolate chips.
Instructions
Combine the sugar, dry milk powder, cocoas, and salt in a small bowl.

Pour the milk into a blender. Add the dry mixture and ice. Blend until all the ice is crushed and the drink is smooth.

Pour into a large goblet or two 16-ounce glasses. Top the drink with whipped cream and shavings from a semisweet chocolate bar.

Pour into two cups and top with whipped cram and chocolate shavings.
Powered by Recipage

Thursday, August 11, 2016

Half Bath Before Photos and Inspiration

This time last year we were in the midst of a major kitchen renovation.  Half our downstairs and our most usable space was gutted.  The project went over budget and last well past my end all completion date. Looking back I am not sure how we survived as well as we did. I swore it would be a nice long time before we tackled another major project.  Apparently my memory starts to fade after a year because around May we started discussing our next major project. The plan was to due our big full bath upstairs. This is the one for our guest and the place where we bathe Miss O.  The are many reason for why we chose this to be our next project but that is a different post. The major difference here is that we were going to hire this project out.  However the estimates came in much higher than expected and way above our saved project funds. We decided we might do a few more minor updates around the house but for the most part we were going keep saving and wait to do the bathroom a bit later. 

Well as luck would have it, or not, our downstairs toilet started leaking.  Even though we could have just fixed the toilet, there was a high chance that the leak had damaged the sub-floor under the tile. This along with the fact that the bathroom was pretty dated and I absolutely hated the sink we decided to redo the whole thing.


As we are about to embark on this new renovation project I am horrified as to what I agreed too.  We have a plumber and there is no electrical work needed.  In the whole scheme of renovation work, what we need to do is fairly simple but there will be a lot of firsts and we have an active toddler to take care of too. The only consolation is that if we completely mess up and it takes much longer to put back together we are no worse off than we are now as the toilet does not function. 


So here we go again...I tried to plan out as best we could the design well ahead of our construction work. We have gathered all the main materials and components but despite my best efforts we are going on trip 3 to Home Depot and it probably won't be our last.


Some inspiration pictures....

ikea hemnes bathroom - Google Search:
*IKEA Hemmes vanity


Chris Love Julia half bath renovation


Black penny tile

Wish us luck!

Monday, August 8, 2016

Creamy Banana Cinnamon Popsicles


I have the Monday blues and am not looking forward to work. This weekend was so wonderful.  We didn't do anything extraordinary.  Our biggest event was getting pizza Saturday night unexpectedly.  Sometimes though it is just the little things that make the best weekend.  Also, I was gone all last week. Just being home made me feel much better. 

I do have a lot to do at work though. My to do list is already and I am raring to go get it done.  As much as I would to stay home and do nothing I am still ambitious for work.  Does that ever happen to you?


During one of Olivia's naps this weekend I whipped up these banana popsicles.  I haven't made nearly as many Popsicles as I had planned this summer. These are only my second attempt.  They were clear winners though.  Olivia has been teething.  Teeth pains along with it being hot seemed like the perfect combination of circumstances to get some Popsicles ready.


These popsicles came together in under 10 minutes and use pretty standard ingredients.  We already went through four.  As you can from the picture above, we had a stick issues with one of the Popsicles.  Mr. J had to pry the lid off because one of the sticks had gone crooked. He manged it off with no hard to any of the Popsicles.


Creamy Banana Cinnamon Popsicles

by Emily Morris
Prep Time: 10 minutes
Cook Time: at least 3 hour freeze time
Keywords: blender breakfast banana cinnamon ice-cream
Ingredients (7 popsicles depending on mold)
  • 2 large ripe bananas, thinly sliced
  • 2 tablespoons brown sugar
  • 1 tablespoon butter
  • ½ teaspoon cinnamon
  • ½ cup plain yogurt
  • ½ cup milk
  • 1 teaspoon vanilla
Instructions
Place bananas, brown sugar, butter, and cinnamon in microwave safe bowl. Microwave on high power for 30 second intervals, stirring after each interval, until bananas are soft, about 2 minutes. Set aside to cool.

Place banana mixture in blender along with yogurt, milk, and vanilla. Process until smooth, about a minute.

Pour mixture into popsicle molds. Freeze at least a 3 hours or until frozen solid.
Powered by Recipage

Wednesday, August 3, 2016

Banana Oat Snack Cake


Can you believe it is already August? Summer has been flying by. That being said, I am so ready for Fall. The heat and humidity is slowly melting me away.  We aren't breaking records here in Connecticut but it has been consistently hot and humid for way too many days in a row.  It wouldn't be so bad but we don't have A/C.  Most nights are cooling down either.  

Thus far we have escaped to the beach, played in the baby pool and ate in too many restaurants.  I am now ready for Fall and sweater weather.  Anyone else with me?


The heat has made using the oven almost unthinkable.  We went almost a whole week without using it or the stove top really. Thank goodness for a toaster oven.  You can do so much in a little toaster oven.  

I broke our no oven streak one morning during a bit of relief through a rain storm.  I had this banana oat snack cake recipe saved for forever.  We just never had enough bananas ready to use until today.  I put a little "no eat" note on the few we had left and Mr. J minded the message.

It was perfect timing as we had guests to help share in this sweet treat.


Although a cake this recipe is packed full of oats.  It is kind of like a glorified banana bread.  A bit more dense with just a hint of cinnamon. We have supplemented our breakfasts this week with a piece of this fun snack cake and enjoyed a bite or two each afternoon.  


Banana Oat Snack Cake

by Emily Morris
Prep Time: 15 minutes
Cook Time: 40 minutes
Keywords: bake dessert banana oatmeal
Ingredients (serves 12)
  • 6 tablespoons unsalted butter, cut into ½” pieces, melted, plus more for baking dish
  • 1½ cups old-fashioned oats
  • 1 cup all-purpose flour
  • 2 teaspoons baking powder
  • 1 teaspoon ground cinnamon
  • 1 teaspoon kosher salt
  • 1¼ cups (packed) light brown sugar
  • 2 large eggs
  • 1 teaspoon vanilla extract
  • 3 bananas, chopped
Instructions
Preheat oven to 350°.

Lightly coat an 8x8” baking dish with butter and line with parchment paper.

Whisk oats, flour, baking powder, cinnamon, and salt in a large bowl; set aside.

Whisk brown sugar, eggs, and vanilla in another large bowl until mixture is smooth.

Slowly stream butter into brown sugar mixture, whisking constantly until well blended.

Add bananas to dry ingredients; toss to coat. Stir into brown sugar mixture.

Spread batter in prepared dish. Bake until cake is golden brown and the edges start to pull away from sides of dish, 35–40 minutes.

Transfer to a wire rack and let cool completely in dish. Cut into 12 servings.
Powered by Recipage

Monday, August 1, 2016

Cheeseburger Kebabs #secretrecipeclub

This month for the Secret Recipe Club I had Sarah from Things I Make (for Dinner).  I know Sarah from another blogging group, ‪#‎thebookclubcookbookCC, which we just wrapped up.


Sarah lives in Canada and posts about what she makes for dinner as well as some other scrumptious recipes. She posts what she and her husband actually eat.  Same as me and Mr. J.  This is our little part of the world to share our fun in the kitchen.  Not only do we enjoy cooking together but it is much healthier and cheaper than going out every day.


When I was browsing around thinking about what to make I was pretty much sold on the peach cobbler.  Peaches are just coming into season and I cannot get enough.  I kept looking though and ultimately found this recipe for cheeseburger kebabs.  I had all of the ingredients because I was planning a cheeseburger dinner night.  Sarah's recipe looks like so much fun I had to try it. The cobbler recipe will be used soon.  So might the peanut butter cup pie.


The cheeseburger kebabs were a fun new take on an old favorite.  Also, I learned that grilled pickles are really, really good.

Cheeseburger Kebabs
by Emily Morris
Prep Time: 10 minutes
Cook Time: 10 minutes
Keywords: grill entree
Ingredients (serves 4)
  • 1 lb ground beef
  • 1/2 Spanish Onion, quartered and divided into 3 pieces per quarter
  • 8 slices of pickle
  • 2 slices of cheese, quartered
  • 8 cherry tomatoes
  • 4 wooden skewers
Instructions
Soak wooden skewers for at least 30 minutes before using.

Divide ground beef into 8 equal pieces, and form into small patties. Season well with salt and pepper.

Thread patties, pickles, onions and tomatoes on skewers.

Preheat grill to medium high. Grill well on all sides until patties are cooked through and vegetables are blistered. During the last 2 minutes of cooking, top the patties with cheese and close the grill to allow the cheese to melt slightly.
Powered by Recipage